How to create an Endpoint for consumer in on-prem
- Sherry Wei
- Sep 8, 2023
- 3 min read

Updated: Feb 2, 2024
This document shows you how to create an Endpoint for consumer in on-prem data center or offices.
This guide is for the use case where consumer is in the on-prem data center. If your consumer is in a AWS VPC, consult the guid for "How to create an Endpoint for consumer in AWS".
An endpoint is a construct and entry point to access an application via Bumblebee Networks cloud. An endpoint represents the service consumer of the application. The endpoint is represented by a unique public DNS name. An endpoint can reside on-prem or in the cloud. When an endpoint resides on-prem, it runs on a Bumblebee Endpoint Node (virtual machine) in your data center.
When an endpoint resides in the cloud, it is invisible to end users as it is deployed inside Bumblebee cloud, it is run in a cloud instance.
Create Endpoint for consumer on-prem
In order to create an Endpoint, you must already have the corresponding App Service ID that the Endpoint wishes to connect to. After the Endpoint is successfully created, hosts on the network premise where Endpoint is deployed can access the application associated with the App Service ID.
Below are the steps to create an Endpoint.
Log in to the platform console
At the left navigation bar, click Endpoints
Click + Create Endpoint
Enter the endpoint name
Enter the App Service ID you obtained from the App Service account owner.
For Location field, select on-prem.
Select an Endpoint Node Group in the drop down menu. If the Endpoint Node Group list is empty, follow the instructions on How to create Endpoint Node and Endpoint Node Group to create one.
Select an Endpoint Node from the list under this group. If the Endpoint Node list is empty or you like to create a new one, follow the instructions on How to create Endpoint Node and Endpoint Node Group.
Click Create.
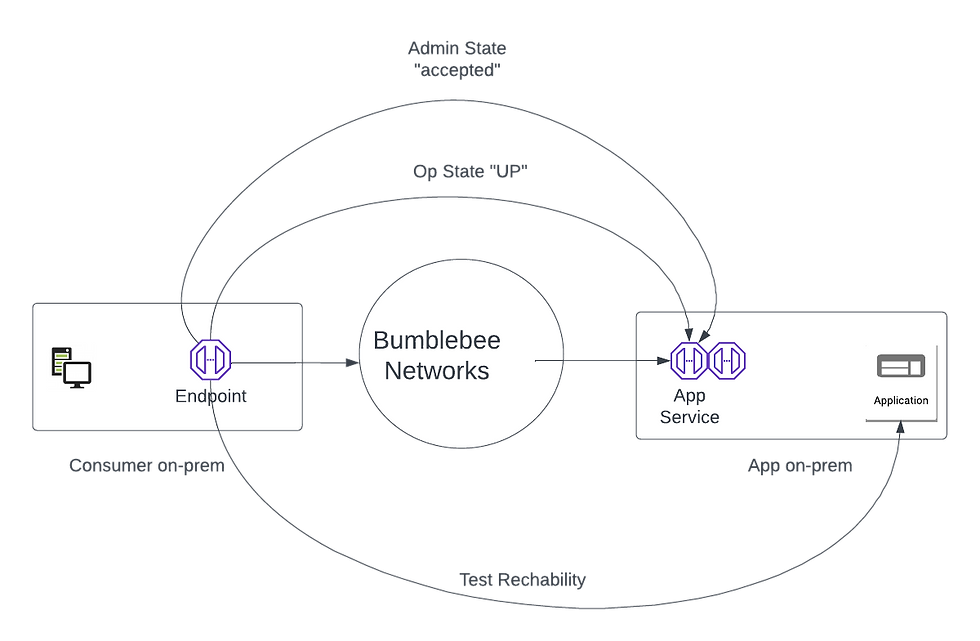
Once the Endpoint is created, its Admin State goes to "pending". An email notification is sent to the App Service account owner to approve your Endpoint. (If you own the App Service, go to App Services page, select the App Service and select the Endpoint and click Approve.)
Once the Endpoint is approved, its Admin State changes to "accepted".
Wait for the Endpoint Op State changes to "UP". (If this is the very first Endpoint to the App Service, it may take up to 15 minutes for the state to change due to DNS propagation time.)
Once the Endpoint Op State is in "UP" state, copy the App DNS Name field, as shown below. From the Endpoint point of view, the application's DNS name is the App DNS Name. If you like to customize the name, add a CNAME record in your local DNS server that points your desired DNS name to the App DNS Name.

Troubleshooting Tips
If a consumer has connectivity issue, check the following status.
Check if the Admin State of the endpoint is Approved. If not, notify your app service owner to approve the endpoint connection request.
Check if the Op State of the endpoint is Up. If not, check if the data center has UDP port 443 open to *.bumblebeenet.com
Run a Reachability Test by clicking Actions for the endpoint and test if the endpoint can reach application.
Run a Show Source IP by clicking Actions for the endpoint and display if the host machine can reach the endpoint.
For more detailed instructions, follow the document outline here to troubleshoot the problem.


Comments