BN-CPE-1000 and BN-CPE-1000F Tutorial
- Sherry Wei
- Apr 2
- 3 min read

Updated: 1 day ago
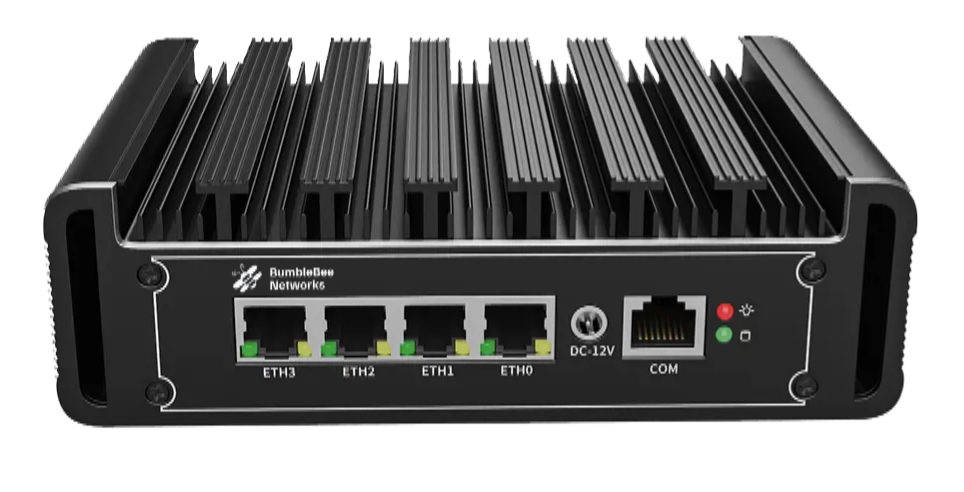
BN-CPE-1000 and BN-CPE-1000F are two types of Internet NID device that provides demarcation function for service providers. In addition, it is a services rich device that offers monitoring, performance testing, application visibility, application troubleshooting and diagnostics capabilities. This document is a tutorial to create a BN-CPE-1000 or BN-CPE-1000F device.
For a list of the service features, refer to BN-CPE-1000 service features document.
The workflow is simple:
Create a BN-CPE-1000 or BN-CPE-1000F device from the Bumblebee portal. You should see the device's Admin State on the Bumblebee portal as "Provisioned" and its Op State in Red.
Bumblebee ships the device to the shipping address you specified.
Once the device arrives at the site, the technician or customer follows the plug and play instructions to install the device.
Once the device is installed and powered up, it registers with the Bumblebee portal and changes its Admin State from "Provisioned" to "Registered", and its Op State from Red tp Green.
(Optional) You then run RFC 2544 Activation Test and retrieve the PDF test result report to provide proof for the link speed
Prerequisite: Create an Account
If you have not done so, register an account on Bumblebee platform by clicking this link.
Step 1. Create a Device (Internet NID: BN-CPE-1000)
Login to the Bumblebee portal.
On the left navigation bar, click Internet NIDs.
Click Create Device
Enter a name for the device you wish to create.
For Product Code:
Select BN-CPE-1000 if there is no fiber port for either WAN or LAN ports. (In another words, both WAN and LAN ports are copper)
Select BN-CPE-1000F if either WAN (ISP hand off) or LAN (site internal network hand off)
Enter fields for Shipping Address, Site Address, etc.
Select Pass Through or Router Mode with the following guidance: If ISP only provides one /29 or /28 subnet, select Pass Through. If the ISP provides two subnets, for example, one is a /30 and another is /29, select Router Mode.
If BN-CPE-1000F is selected, user also needs to check:
WAN Interface: check "Use SFP port" if ISP hand off is fiber (Eth4)
LAN Interface: check "User SFP port" if site internal network hand off is fiber (Eth5)
If Pass Through is selected:
The CPE Management Interface needs to take one IP address from the ISP provided /29 subnet (or whatever subnet is CPE is deployed in). This IP address is obtained dynamically via DHCP or statically configured.
Select DHCP Client if this subnet supports DHCP for obtaining IP address.
else (this is the most common option) enter one static IP address, the ISP default gateway and DNS server IP(s).
If Router Mode is selected:
For WAN Interface (Eth0):
Select DHCP Client if the subnet supports DHCP option for obtaining IP address.
Enter a static IP address from the WAN subnet pool. Also enter the ISP Default gateway IP and DNS server IP(s)
Enable Source NAT
For LAN Interface (Eth1):
Enter a static IP address from the second subnet (for example a /29 subnet). the LAN Interface is the default gateway IP for the subnet.
Click Create
When the Create completes, the device is displayed in the page. Select the device, the second half of the page displays its Details information.
Step 2. Shipping the device
The Create action triggers a process to build the image and ship the device to its shipping address specified in the create form.
Step 3. Installing the device
This step may be accomplished by a field technician or an onsite IT personal.
For BN-CPE-1000, follow the instructions here to install the device.
For BN-CPE-1000F, follow the instructions here to install the device.
Once the CPE is powered up, it registers with the Bumblebee portal. If everything goes well, the device on the portal should change its Admin State to "registered" and its Op State to green indicating is device is in operating state.
Step 4. Activation Test
This is an optional step and can be executed at any time once the device is in operational state.
Follow the instructions here to run the test and retrieve reports.


Comments